top of page

Custom Les Paul Kit Guitar
2024
Kit guitar project involving intricate finish work, custom-wired electronics, and handmade bone nut.
This was my first time building a guitar from a kit, and I learned so much in the process. The build was a rollercoaster with many setbacks, but I was able to get it together in the end, and I am very proud of the results.
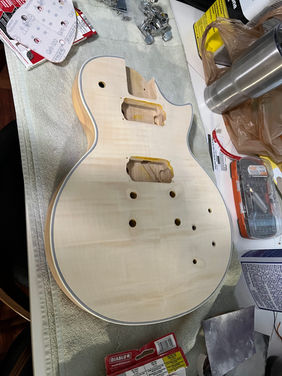
I received the guitar from a close friend in exchange for fixing up his 1962 Silvertone guitar amp. It was assembled and playable, but the guitar had no finish and the bridge pickup didn't work. I started by rewiring the guitar, and it sprang to life.
After playing the guitar for a bit, I knew I needed to get a finish on it before my hands made a mess of it. I researched different les paul finishes and fell in love with a teal to black sunburst. The guitar had a nice maple top, so I wanted to do the teal color with dye to leave some of the wood showing, while the black would be opaque paint. I decided to extend the black paint to the back of the guitar and the neck, as is common with gibsons.
After sanding the guitar down for a fresh and even stain, I applied a blue-gray mixture of dye from transtint and then sanded it back. This process emphasizes the grain pattern, making it appear more dramatic. After that, I applied a custom blue-green mixture of transtint to reach the final color. This turned out more of a forest green color than I had initially planned, but it looked great.
Unfortunately, this lifted and wrinkled the veneer in a few places. I sanded these areas back and applied filler. Thankfully, they were near the edge, so they would be hidden by the black sunburst. I followed this up with a few coats of shellac as a sealer.
Next step, I sprayed a sunburst of black spray paint. It was a bit more wide and gradual than I was aiming for, but this is because they generally use spray guns at factories, and not cans. I was still happy with the nice, even appearance, and I sealed that in with some more shellac.
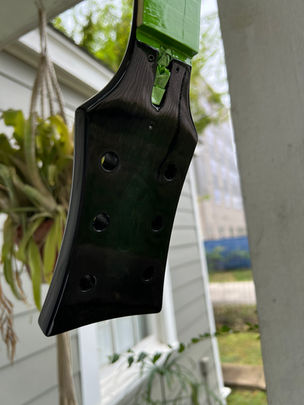
For the neck, I began by tracing the curve of the headstock and using that to shorten and shape the end to match. I first rough cut with a hacksaw and then finalized the shape with files before finish sanding. Then, the headstock got the dye and sunburst finish to match the body, while the rest of the neck, aside from the fretboard, was painted black.
I masked the face of the guitar and painted the back and sides of the body black. Unfortunately, this turned out to be a disaster. While the shellac seemed dry to the touch, it was far from ready to accept masking tape, so the finish on the front was completely ruined. I sanded it back and started over with the sunburst. I went through a few minor but similar mishaps getting it how I wanted, and then used a razor blade with a special holder to scrape away the paint on the very edges to expose the binding again.
After getting the binding just right, I added some more shellac and sanded it to eliminate the lip created by the scraping. I learned the hard way that Shellac takes way longer to dry than is advertised, and needs to be very dry to be sanded to a high grit. I let the body hang and dry for weeks to be certain and then sanded it up to 800 grit. I don't think I will use shellac this way ever again. It lacks the durability that I want in a guitar, and it takes way too long to dry. I would only use it as an interface layer between two incompatible finishes, if needed.
The moment of truth was finally closing in. I got some automotive 2k catalyzed polyurethane high gloss clearcoat in the mail, and hit the body and neck with it. It went on very smoothly, and had very impressive self-leveling characteristics. Thanks to its catalyzed formula, it dried very hard in 24 hours.
The rest of the process went very smoothly. I bolted the neck on, pressed in the posts and tuner bushings, and redrilled a few screw holes. I traded some guitar effects for a pair of Lindy Fralin high output humbucker pickups and purchased some CTS pots and orange drop caps with treble bleed resistors. I wired those up with the original switch and output jack. I made my very first custom bone nut with some help from Yano Garcia at the Gas Station guitar repair shop in Houston, TX. I set the action and intonation. I picked out an old school black leather strap to match its appearance and support its heavy weight.
Overall, this guitar rips and looks great doing it. The Lindy Fralin pickups sound great and the guitar has a lot of sustain. The black parts are nice and dark and inky. In low light, the guitar appears completely black, but the green comes out nicely in bright light. I think the only thing that would really improve the guitar's playing would be leveling and crowning the frets, which I plan on doing to all my guitars as soon as I invest in the tools. This was a frustrating experience while I was learning the ins and outs of wood finishing, but it was ultimately very satisfying.


bottom of page


